Harbor Freight Tools 219 User Manual - Page 7
Locking Plate 20.
 |
View all Harbor Freight Tools 219 manuals
Add to My Manuals
Save this manual to your list of manuals |
Page 7 highlights
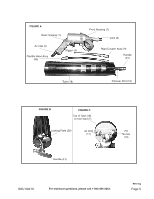
Loading with a Filler Pump (not included) See the Assembly Drawing on page 10, Figures A, B, and C on page 5 and FIGURE 1 on page 6. 1. Slowly, pull back and fully extend the Handle (21). Lock it into place with the Locking Plate (20). 2. Insert the Filler Plug on the end of the hose of the Filler Pump (not included) into the Nozzle (10). 3. Follow the instructions provided in the Filler Pump manual (not included) to operate the Filler Pump until the Tube (18) is full. 4. Disconnect the Grease Gun from the Filler Pump (not included). 5. Press the Locking Plate (20) and release the Handle (21). Press the Handle (21) in as far as it will go. Operating the Grease Gun Note: If your application requires the Flexible Hose (9b), attach it to the Rigid Coupler (9). Note: If your Grease Gun fails to work, it is usually because air pockets have formed in the Gun. To remove them, disconnect the Grease gun from the air supply. Pull back and fully extend the Handle (21). Now push the Handle forward into the Grease Tube while depressing the Air Vent Valve (11). Reconnect the air supply to the Grease gun and then squeeze and release the Trigger (3) several times until the trapped air is expelled. Repeat as needed. See FIGURE C on page 5. Before every use, prime the Grease Gun by operating the Gun (see below) until grease flows from the tip. If it does not prime properly, follow the directions above for venting trapped air. 1. Attach the Grease Gun to the air source hose following the directions on page four. Set the air compressor to 30 - 100 PSI. 2. Squeeze the Trigger (3) to inject a small amount of grease. Release and squeeze the trigger repeatedly to inject more grease. 3. Disconnect from the air source hose before refilling the Grease Gun. Turn off the air compressor. Warning!! The Grease Gun may still have air pressure after disconnected from the air source. Point the Grease Gun into a suitable receptacle and fire it until all of the air is expended. SKU 00219 For technical questions, please call 1-800-444-3353. rev 05i; 06g Page 7
-
 1
1 -
 2
2 -
 3
3 -
 4
4 -
 5
5 -
 6
6 -
 7
7 -
 8
8 -
 9
9 -
 10
10 -
 11
11
 |
 |
